Garry’s Mod server configuration gives administrators full control over all aspects of the game. It allows you to fully adapt the game to the needs of the often demanding community. The server allows you to install additional maps, mods and plugins that improve the gameplay and allow you to offer unique functions often unavailable on other servers. Experimenting with your server gives you the chance to test out different settings and game modes, which is welcome on Garry’s Mod servers!
How to configure Garry’s Mod server through our game server panel:
1. Stop your server
Open game server panel in your favorite browser and select your Garry’s Mod server from the list. You should be redirected to the “Console” tab where you can quickly select “Stop” button.
2. Change server variables
Once your server is stopped it’s time to change some parameters. Go to the “Startup” tab where you will find the most important variables.
| VARIABLE | DEFAULT VALUE | DESCRIPTION |
| Map | gm_flatgrass | Set default map for your server |
| Steam Account Token | – | Assign GSLT token to the server |
| Workshop ID | – | Type in ID of your workshop collection |
| Gamemode | sandbox | Change gamemode |
| Max Players | 10 | Set maximum amount of players allowed on your server |
| Tickrate | 22 | Define how fast server will update each entities location |
| Lua Refresh | OFF | Enable/disable Lua Refresh |
| Server Name | default hostname | Assign name for your server |
| Server Password | – | Set server password |
| RCON Password | – | Set admin password |
| VAC Protection | ON | Enable/disable VAC Protection |
| Maximum props | 150 | Set maximum amount of props a single player can create |
| Maximum ragdolls | 10 | Set maximum amount of ragdolls a single player can create |
| Maximum NPCs | 10 | Set maximum amount of NPCs a single player can create |
| Maximum balloons | 10 | Set maximum amount of balloons a single player can create |
| Maximum effect | 10 | Set maximum amount of effect a single player can create |
| Maximum dynamites | 10 | Set maximum amount of dynamites a single player can create |
| Maximum lamps | 10 | Set maximum amount of lamps a single player can create |
| Maximum thrusters | 10 | Set maximum amount of thrusters a single player can create |
| Maximum wheels | 10 | Set maximum amount of wheels a single player can create |
| Maximum hoverballs | 10 | Set maximum amount of hoverballs a single player can create |
| Maximum vehicles | 10 | Set maximum amount of vehicles a single player can create |
| Maximum buttons | 10 | Set maximum amount of buttons a single player can create |
| Maximum entities | 10 | Set maximum amount of entities a single player can create |
| Maximum emitters | 10 | Set maximum amount of emitters a single player can create |
| Enable Godmode | OFF | Enable/disable godmode |
| Enable NoClip | OFF | Enable/disable noclip |
3. Change more advanced parameters
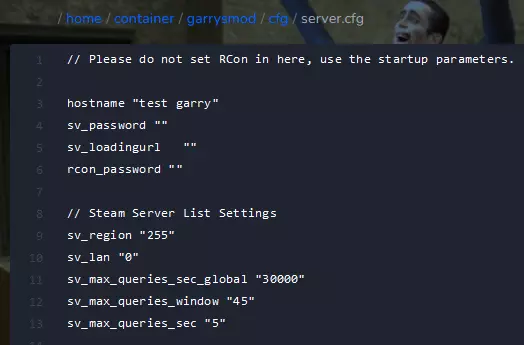
If you are not satisfied with the configuration performed in the “Startup” tab, you can change various parameters in the configuration file. Go to the “Files” tab to access the server files and follow this path: /home/container/garrysmod/cfg/server.cfg

4. Start your server
Come back to the “Console” tab and select “Start” button.
We hope that our intuitive web interface has allowed you to manage your Garry’s Mod server easily. If you want to ask us any questions, feel free to contact us via e-mail, ticket or live chat!
This tutorial will show you how to configure Garry’s Mod server

